
Astronomy and the Weather
Ask any astronomer who has been at it for a long time and they will tell you, in rather amazing detail, something about the upcoming weather.
“New moon this Saturday night. Clear skies expected in the low 50s. Good transparency and astronomical seeing, but wind gusting to 15 mph. I’ll probably leave the shroud off the dob this weekend.”
As connected as we are during this era of cell phones and the internet, we can generate an all-important weather forecast from our pocket. This is great for the astronomer, as our evening (and our safety) is dictated exclusively by the weather conditions.
But there’s no more proof that amateur imagers are also amateur meteorologists than to look at the array of sophisticated weather equipment embedded into many an amateur observatory…
Control panels and sensors for temperature, humidity, wind speed, rain fall. Charting software. Cloud sensors, seeing and transparency monitors, all-sky cameras, and Internet satellite imagery with forecast models.
If that’s not enough, the observatory handles this weather data intelligently and interactively by providing protections and interrupts; both proactive and reactive measures to guard against unsuitable and potentially damaging weather conditions. Programmable shut-down events are standard practice now, such as automated shutter closing at 30 mph wind gusts or equipment shutdown when the temperature is 3 degrees from the dewpoint.
Sidebar: The Clear Sky Clock
Back in 2003, I had the privilege of meeting Attila Danko at the Texas Star Party. Founder of the “Clear Sky Clock,” Attila travelled from Canada to give a presentation about this great astronomy tool. As somebody with a newly-built home observatory, I loved that Attila was quick to generate my own clock, shown below.
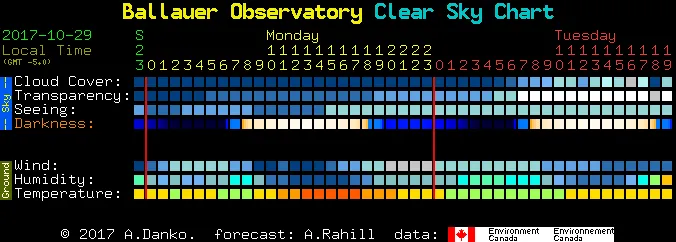
Today, the Clear Sky Chart remains an important, quick glance tool for forecasting your conditions within a day or two of an observation. Using an easy metric or blue blocks for clear (or stable) and white blocks for cloudy (or turbulent), not only is the chart readable, but I find it to be extraordinarily accurate. Owners of their own observatory can ask Attila to create a Clear Sky Clock by visiting www.cleardarksky.com/csk/ and then following the instructions.
Or to take it a step further, how about an observatory management system that can automate educational research requests, whereas observations can be queued according to a wide ranging list of priorities and triggered by particular weather conditions. So, for example, the system uses its transparency sensors to rate the sky based on a set of criteria and then it chooses the queued observation to best take advantage of the conditions. Or perhaps it opts to delay a deep sky imaging session when the system realizes, based on cloud sensor data, that other shorter observations (taking star spectra or measuring a variable star brightness) will be a more efficient use of the evening.
But regardless of how avid you are, even if you don’t have a permanent observatory, in the very least, it’s difficult to get by without learning how to read the Clear Sky Clock (see Sidebar: The Clear Sky Clock) for your area!
Internet Weather Tools
There are obviously many ways to skin this cat, and the weapon(s) of choice often comes down to what the end user is most comfortable with.
On my phone, I prefer the Weatherbug app. I find the single click radar with cloud overlay to be very quick, as well as quite accurate. Looping the radar works well, with very few gaps in the data. This is a pet-peeve of mine, as nothing frustrates me more than to wait for all the weather frames to download and then watch the animation jump all over the place.
For a glimpse of the cloud cover, regardless of the app, you will need to choose a “visible” cloud overlay during the day and the “infrared (IR)” overlay when it’s dark. If you loop this animation, you get a good glimpse at potential holes in the clouds, allowing you to know about when the conditions should clear up again.
When on a PC, I really like NOAA’s Aviation Weather Center (aviationweather.gov/satellite). Not only are the weather maps terrific with good resolution and contrast, but the regional maps can be changed between visible, infrared, and water vapor in a simple drop-down menu. Of course, there’s a lot to explore at NOAA, with forecasts, maps, and a variety of overlays to show exactly what you want.
Another terrific site in a chart format similar to the Clear Sky Clock is clearoutside.com whereas you can see a similar display but with more items in the chart, including wind speed, a distinction in cloud levels, and even ISS passovers. It’s billed as “astronomy weather by astronomers” and it seems as though they have done a good job of providing the information we need.
Other sites that I’ve used are Weather.com, Weather Underground, Intellicast, and Accuweather. These are typically used for long range forecasts, your choice dictated by the site you feel is accurate most frequently, which means it likely changes depending on who you are. For the most part, we all tend to use multiple sources in this regard, usually seeking consensus or going with the majority rule. Due to the sheer difficulty of accurately predicting weather, that’d be my recommendation to you as well.
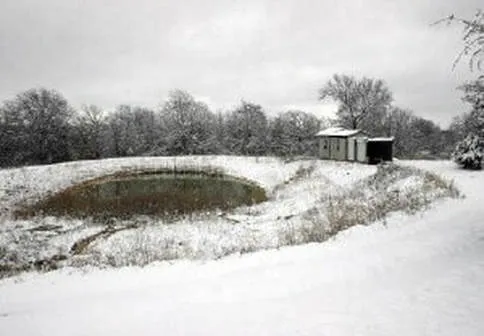
Rare winter snow at Ballauer Observatory in 2002.
Making the Best of It
So you’ve done your forecasting and have decided to setup a telescope anyway. Of course, weather doesn’t always conform to your expectations. At that point, you will need to be both protective and productive given the circumstances. The following are some tips and recommendations for various types of weather conditions that might happen upon you during a night of observing.
Cold Weather
Good protective clothing is key to enjoying a night in the cold conditions. Unfortunately, it’s taken me years to figure this out and I’m not sure I’m ever adequately prepared for the worst of what winter can throw at you. A few tips in bullet form might be appreciated:
- Dressing in layers is my default approach to combating the widely varying temperature changes we can get at my favorite west Texas observing site. I typically have my undershirt, a fleece pull-over, a wind-breaker (or light zip-up jacket) and a heavy coat with hood, as needed. A balaclava or toboggan is standard fare in extremely cold conditions, but more often than not, I just use a ball-cap and pull a hood over my head to protect my neck. As a quick tip, the ball cap allows me to cinch up the hood tightly without it dropping over my eyes. Add a clip-on red light and you are good to go.
- I typically do a bad job of layering below the waist, as I feel it’s difficult to accomplish due to the bulky, restrictive feel of it. I’m not a fan of long-underwear, but a good set of thermals is a good base layer for most people. I typically wear shorts (being the Texan I am), followed by jeans, and if needed I will throw some loose fitting “sweats” over the top. Regardless, I think a good blanket or quilt is important to cover the legs if you are sitting down for most of the evening, which is typical of us astro-imagers.
- Speaking of sitting, I do a bad job of protecting my waistline, especially when the wind is blowing. There is nothing worse than bitterly cold wind on exposed skin. So, tucking in a clothing layer is good. So too is buying a longer jacket that actually covers you.
- “Thinsulate” boots or double-layers of socks works well for feet. More often than not, I do multiple layers of socks with my tennis shoes. I don’t always like to carry around a bunch of shoes and boots, so I like to limit my packing list somewhat.
- When you know that the weather will be extremely cold, then a full protective jump suit or hunting gear is a great way to go.
- Gloves are tricky. I like a thinner type that has a flap to cover or uncover bare fingers. This lets me use the keyboard better when imaging. When observing, eyepieces get cold, but you don’t want gloves that make you lose the feeling of the $600 Nagler in your hand. They sound horrible when dropped. Again, thinner gloves are probably better…and a good set of pockets to put them in will be your saving grace.
- Chemical hand warmers (heat packs) are great, especially since you likely will be wearing thin gloves, if at all. Buying a large package of them is quite inexpensive and will certainly last you through the cold season. Don’t overlook what the heat packs can do to keep an eyepiece or green laser pointer warm as well. The latter is especially sensitive to cold and they must be kept warm to work properly.
- Camp fires sound like a wonderful idea on a cold, casual evening, but you can’t see stars through the smoke. They are a no-no, unless camping is more on your agenda than actual observing. If you insist on a fire, then please observe any local burn-bans - too many people can be affected by your poor decision in that regard.
- Taking breaks is highly recommended on cold evenings. This allows you to move around, perhaps grab a warm cup of coffee or cocoa, and go sit a spell in the warm room. On really cold nights at the Texas Star Party, you will often see me at the snack stand or in a friend’s RV.
The great thing about imagers is that we do not have to be restricted to our stations. Because all of our scopes and cameras are driven by software on our laptop computers, as long as we have a wi-fi internet connection to our laptops then we can use another device or laptop to remote control it using any number of “remote desktop connection” software. I use LogMeIn, a subscription-based service and have also used TeamViewer to accomplish the same. If it’s your home network, then a simple peer-to-peer RDC connection is the most optimal way to do this, eliminating any lag that occurs by routing your connection through the Internet.
Of course, if you haven’t figured out why you would want to do this, then picture me, sitting comfortably in the toasty warm classroom at Comanche Springs Astronomy Campus (CSAC) in Crowell, Texas, sipping on coffee (or beer) and enjoying some snacks with my friends. We all have inside laptops (or devices) mirroring the outside laptop that’s driving the imaging gear. It does all the hard, cold work. Me? I feel like I’m on a beach in Tahiti.
Lastly, you should try to be prepared for cold weather that can occur out of season. Very seldom am I unprepared during the winter months. It’s SUPPOSED to be cold during the winter so I typically have done my due diligence there. It’s the spring and fall months that can surprise me! In Texas, the saying is, “If you don’t like the weather, just wait an hour.” In the typical dry panhandle or west Texas area, a blue-norther in October can turn you frozen in a heartbeat. I have been caught in shorts and t-shirt without any pants or a jacket. It will likely happen again at some point…and I’ll be the one still wearing flip-flops.
Hot Weather
To clothe yourself in hotter climates, there are a couple of philosophies…either wear as little clothing as possible OR cover everything up in light-weight materials to protect from the sun. I am most certainly in the former camp, since I don’t anticipate the sun coming out when I’m doing night-time observing. However, if you are setting up a telescope during the heat of the day, then you should protect against the sun’s harmful rays. I am a shorts/t-shirt/ball-cap kind of guy. I sometimes wear sunscreen, but usually I don’t. Don’t judge me.
Most people are totally fine where the temperature is concerned, but it’s all the other things that come with it that you should remember.
For example, I hate sweating all night long, which is likely inevitable during August in Texas. Sweating in glasses is the worst - contact lenses are your friend here. A simple box fan isn’t a bad idea either, as long as it doesn’t distract your neighbors. Not only will it keep you cool, but it keeps mosquitos away and can move out bad seeing zones around your telescope.
Speaking of mosquitoes, they naturally come out during warmer weather. Bug spray, area foggers, and mosquito-repelling clothing are certainly nice to have. Other critters can be a nuisance as well. Around here, we own snake boots.
Wind
When we think of weather affecting our astronomy, we usually imagine wind. Wind is the least of all weather “evils,” and we typically do not mind a little of it - it means that we can still do some observing!
Moreover, a little wind is typically a good thing, since it works to move air around the telescope, equalizing any temperature “zones” that can cause atmospheric turbulence from layer to layer. I am convinced that 90% of what we call “bad seeing” can be solved by turning over the air within 30 feet of our telescopes. While we don’t want so much wind that it affects our images and our views of the night sky, we definitely do NOT want totally still conditions, especially during the summer when a little breeze is refreshing.
Moving the air around our optics is important to good seeing, which is why we tend to use fans with our instruments. Many dobs and catadioptric scopes have built-in DC fans to acclimatize the temperature around the optics. But not many people realize the advantage of a simple box fan positioned at the telescope. You should take the opportunity to move the air in and around your area, taking care of radiant heat sources and preventing pockets of air from forming over the telescope.
There’s a reason why Texas is littered with huge windmills that pepper the landscape - we have the highest sustained wind speeds of anywhere in the country. What this means to the Texas astronomer is that red, west Texas dirt gets EVERYWHERE - inside observatories, within the grease of our telescope gears, and all over our optics. In fact, dirt is such a problem with our efforts at CSAC that we must double our efforts when it comes to our facilities and our telescopes - observatories must be routinely cleaned and our optics must be inspected, cleaned, and recoated with greater frequency. While it’s good to be proactive about the dirt, perhaps enclosing as many of our structures as much as possible, the reality is that we can only deter a small percentage of it.
As the owners of much valued and prized astronomy gear, it means that we need to be equal parts astronomer, meteorologist, and mechanical engineer! User serviceable components should be a consideration when we purchase our gear, particularly mounts. Bearings in our dob must be routinely maintained. A can of compressed air should be close at hand to blow off optics and inside of CCD cameras. You will need to be comfortable disassembling the filter wheel inside your camera. You shouldn’t be too worried about cleaning optics if you know how to do it the correct way for all of your telescopes, binoculars and filters (see Sidebar: Cleaning Optics).
Rainy Conditions
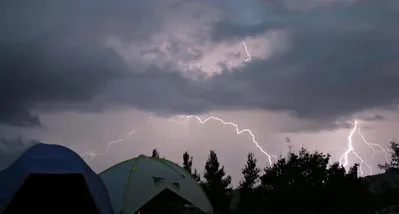
Location: Texas Star Party 2004 near Ft. Davis, Texas. Date: May 20, 2004. Transparency: Pretty terrible! Seeing: A bit unstable! Equipment: Canon Digital Rebel (300D) on a tripod. Exposure Information: Two 25 second shots @ ISO 100. Processing Information: Aligned, combined, cropping and levels adjustment in Photoshop CS.
Sometimes, rain happens, despite your most optimistic of forecasts. When this happens, you should anticipate a few things.
Covering up your gear is a prerequisite in this hobby; rain or not. But rain has a way of seeping into all kinds of things, so you should make sure that vital gear is protected in rain-proof cases. A good all-weather scope cover (my favorite is the Telegizmos 365) is terrific. In the least, the telescope needs a cover of some type. Bungie it down to keep sideways rain out of it.
If you accidentally get some gear wet, unplug it or remove the battery (if it is electronic) and then allow it to dry out.
When finding dark skies, we usually are forced to dirt roads and country landscapes. Rain produces mud and it’s too easy to get your vehicle stuck in such conditions. Even at CSAC, as complete of an infrastructure as we have, the roads and pathways are gravel. Cars must stay on the roads…and you should plan on a carwash when you get home. Our scopes are typically setup on grass, so even a strong downpour doesn’t prevent us from walking around a bit, albeit on squishy ground. We just have to be careful where we’ve parked our car.
When you find yourself in cloudy and raining conditions, then you definitely should have a “Plan B.” At CSAC during public events, we typically have presentations that can be done indoors. If it’s just us astronomers, then we hang out and “knock a few down.” If you are an imager, then it’s a perfect opportunity for taking dark frames. When we are rained out at the Texas Star Party, it becomes “movie night,” hosted in a friend’s RV.
I have come to expect about half of my nights being cloudy or rainy at star parties. When I first started in the hobby, it was heartbreaking - absolutely devastating to be clouded out of an eclipse, planetary opposition, transiting event or a meteor shower. Unless it’s a total eclipse - you have every right to cry when weather ruins those - then I’ve learned it’s just the nature of the beast; something that I now take in stride.
A little rain never hurts anybody. In fact, I usually welcome some rain during the middle of a week-long event just to give me a chance to catch up on sleep. Similarly, in west Texas, rain is good to provide for a little vegetation and hold down the dirt a little bit. Just keep your equipment protected and enjoy the earth renewing itself.
Inclement Weather
Sometimes, it doesn’t just rain. It comes down in cats and dogs. Big ones. And if it were only rain, then we would probably be okay with that. However, we could also have lightning, tornadoes, and micro-bursts that can wreak havoc on our equipment. More importantly, it causes concerns about our safety.
Much of this can be accounted for during the pre-planning of the trip. Simply put, if there is a threat of thunderstorms, you might consider staying home. There’s not a lot of astronomy that can be done in those situations.
However, if you are like me, your astronomy-related trips aren’t exclusively about doing night-time astronomy. For me, I will make trips to work on astronomy gear at the observatories, volunteer for public events, and even just getting away from everything and hanging out with astronomy buddies. Any and all of the above can put you in the line of storms, expected, or unexpected.
Some of the tips for dealing with bad weather are universal, like laying in a ditch instead of staying in your car when in the presence of a tornado. Or not holding conductive materials in your hands when there is lightning in the area.
For the astronomer, the best place to be during truly dangerous weather will be inside a shelter, preferably one that is abated with a lightning protection system (i.e. grounding rods). And speaking as somebody who lives in “tornado alley,” inside shelter is not necessarily enough. An underground cellar or bunker becomes mandatory if you are going to be in harm’s way.
This makes communication very important. If you are still onsite when the bad weather hits, then information is golden. Have a friend on the cell phone feeding you instructions, or make sure you have active weather radar and severe weather data to guide your decisions. Make early decisions based on this data and don’t take unnecessary risks. Astronomy can wait.
And when it’s all over, make sure you call home to your family to let them know that you had everything under control. Doing so is being nice, and it might be just enough to guarantee another trip.
Full Weather Systems
For those who are setting up permanent observatories, planning for weather is a key design element. In this section of the article, I’d like to take you through some of the theory behind an observatory weather system, things that I try to account for when building an observatory. Then, I would like to give some specific tools that I find helpful to such efforts.
Observatory Weather Theory
One only has to look at the reason WHY we build observatories to have an idea about HOW we should handle the question of weather.
As a person who is approaching his 50th birthday, I have much less ability or motivation to stay up all night long doing astronomy. Even trying to attend to an imaging session from the safe confines of my easy chair inevitably leads to passing out right about the time that my meridian flip should have happened.
For such people, having knowledge about the actual conditions AT the observatory tells us if it’s safe to open the observatory. We also have a desperate need for weather systems that will shut down the observatory if a rain shower occurs. This level of automation is common place today, a really nice thing to have when you are counting sheep some 222 miles away.
As such, your weather system should have a set of data gathering sensors for providing both immediate and archived data, as well as some automation that will interrupt procedural tasks when sensors are triggered. For example, we obviously wouldn’t open our roll-off roofs when there are 40 mph wind gusts, but what if those gusts occur at 2 AM when you are asleep?
The great thing about having an observatory based almost entirely on motors and micro-controllers is that the automation is actually quite simple using a number of third-party or DIY solutions.
Weather Controllers
Before an observatory can be setup with a weather “controller,” it must be equipped with a managed power distribution unit (MPDU). Think of this as a network “switch” that devices are powered from, something that can be controlled over a network or the Internet. As such, by plugging in all AC devices into a MPDU, you will have control to cycle power to the devices from anywhere that you have a network or internet connection.
This is the key to remote observatory control, since you can “wake” up and shut down the equipment by cycling power over a simple software interface from anywhere in the world. This represents the first layer of control - which is namely a software interface to all of your power hardware.
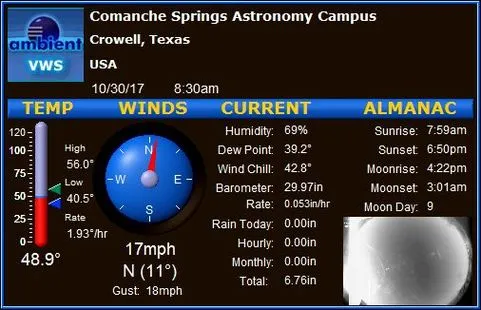
Software for the Davis Weather System provides us with current data of conditions, a nice quick glance of all relatively important information, including an embedded feed to our all-sky camera.
Secondly, you need a remote “pair of eyes” for knowing when and to what extent your control should happen. Network cameras, both inside and outside of the observatory, can give you a live visual for the state of the observatory and its equipment. When you send a slew command to a telescope, you will need immediate verification that it is doing as you anticipated. Else, your expensive telescope could wreck on its own instrument pier. When you place a camera showing the dome shutter or roll-off roof, you will know at a glance the status of the observatory. These cameras, typically requiring 12vDC power, require more than a typical 5vDC USB connection for power. I lean toward power over ethernet (PoE) cameras, which receive both their power and communications over the same CAT-5/6 ethernet cable. Some invest in PTZ cameras (pan-tilt-zoom) that can provide a variety of views in a remote setting, but these cameras are prohibitively expensive ($1000 or more). I prefer a fixed type, something like an all-weather (IP67 rated) Hikvision that costs around $120 to $150 each. The “all-weather” part of the equation is important, of course.
Camera enclosures (among other electronics) are rated as either IP65, IP66, or IP67 (sometimes up to IP68 and IP69) depending on their level of “ingress protection (IP).” This IP rating measures ingress of both dust (first number) and water (second number). Thus, while all the aforementioned ratings have a “6” for dust rating (zero dust ingress), they vary in their water resistance. IP65 will protect against water spray, whereas IP66 will withstand a quick immersion in water. IP67 allows for immersion for longer than one minute at a depth of 1 meter. IP68 and IP69 can withstand higher pressures (water depths) over longer time periods. Because a typical IP (internet protocol) security camera will not be used under water, an enclosure built tougher than IP67 is not necessary for security applications.
An important camera to have is an “all-sky camera.” While many types exist on the market, many users have built their own using a 180 degree “fisheye” lens paired to a typical IP camera. A custom weather-proof enclosure must be created for DIY solutions like this, but they work just like any other IP camera, with the ability to link or embed its feed within webpages and other software interfaces.
At CSAC, we placed our all-sky camera atop a 12 foot mast, keeping the cabling runs short. It needs periodic cleaning, since the clear dome gets dirty in our environment, but it gives us a quick view of the night-time sky. We embed the current sky view (updated each 5 minutes) on our web page at www.3rf.org.
Once the MPDU and cameras are in place, you now have the ability to control an observatory via PC or device anywhere in the world manually. This is typically done via the same RDC software I mentioned earlier. At this point, if you want to open the dome shutter, you push the button. If you want to slew the telescope, you push “slew.” It works exactly as if you were on-site, since you are mirroring the observatory’s PC anywhere in the world.
Now, if only you had access to live weather data at the observatory then you can shut everything down before the rain comes, as if you were actually there. This is why reliable data about weather is critical. Take it from me, seeing water on the observatory floor via the security camera is typically something you want to avoid. For this, I prefer the Davis Weather Station (DWS) Vantage Pro2, which gives me real-time access to current conditions while also providing the ability to archive the data. In this way, you can look for long-term weather trends for your site, as well as witness periodic weather cycles.
But if it does start raining, there is going to be a lag between the time that the analog sensors on the DWS reports it and the time that the end-user can act on it. Thus, we need another level of automation as protection - a proactive way to sense an immediate change in condition (a shutdown event) and then interrupt normal operation to shut everything down automatically. While the DWS is entirely sufficient if you always monitor and provide oversight during a session, we cannot always be as vigilant as we would like.
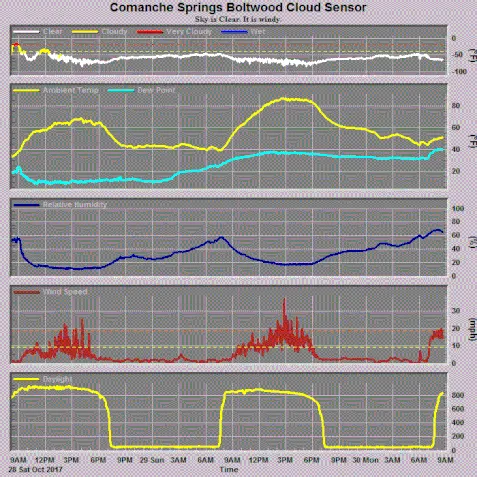
The Boltwood 2 not only provides automated shutdown for an observatory, it gives a nice output of the most recent sensor data. For us, wind is the issue, and as the graph indicates, 20 to 30 mph gusts (or greater) are common place in west Texas.
The great thing about sensors and micro-controllers is that it is not difficult to devise a way to monitor things like wind speed, moisture, and even cloud cover as they happen, and they are intelligent enough to send commands to the observatory control hardware to trigger automated shutdown. On its own, a Davis Weather Station cannot do this, since it’s chiefly an analog data recorder. Instead, what is required is something digital, like a Boltwood 2 device or SkyAlert system, to bridge the gap between sensor feedback and the automated shutdown.
I favor the Boltwood 2, as it interfaces with most observatory control hardware, automating some hardware systems directly, like with the ELK M2 system we use in the Conley Observatory at CSAC. It is also plug-and-play with dome systems such as the AstroHaven clamshells, Pier-tech system, and Technical Innovation ProDomes. I have not used the SkyAlert system, but it should function similarly.
For us, if we have a power outage due to a storm, our system will maintain power (via UPS battery backup) and hardware-level control automates the shut-down sequence. For us (and many others), we have a “park” position sensor (like a garage door laser sensor) that must be “closed” (connected) before our roof is allowed to close. This protects the telescope, which projects above the roof line when it’s operational. Thus, our system knows to “park” the scope, wait for the “closed” home position sensor, and then close the roof, avoiding a catastrophic collision with the telescope AND protecting it against the weather threat. Our roof cannot be moved, even manually, unless the telescope’s park sensor is closed.
The Boltwood 2 provides immediate feedback on several events, including wind speed, moisture, and cloud cover. Thus, the potential for automated “interrupts” to normal operation are plenty. For example, you can setup the system to shutdown automatically if it detects wind at a certain threshold. Better yet, it can prevent opening the observatory if those conditions exist. Of course, rain triggers immediate shutdown, as it should. Interestingly, you can even set shutdown events based on cloud cover. Since the Boltwood 2 can determine the amount of cloudiness in the sky, you can opt to shutdown the observatory if it detects more than 75% clouds, if that’s something you want to do.
A software-level control is typically employed for the astronomy-part of what we do. We use TheSkyX Professional to drive our telescopes and camera systems. In a dome, TheSkyX can control the dome by monitoring telescope movement (most domes “slave” to the mount positioning data). This is the way a dome is “driven,” and such software can also provide an interface to “home” the dome’s position, as well as to open and close the shutter.
At this point, observations would always be done with the astronomer at the controls, but the always-alert weather system interrupts when the weather turns sour, something that we aren’t always capable of seeing during our short naps throughout an imaging run.
Finally, there is an additional level that remote observatory users can implement, which is autonomous, scripted robotic control. Using a variety of packages, like ACP, CCDAutoPilot, and CCDCommander, the user can set up an observation during the day using a simple form, and the software plans the observation, from dome opening to morning shutdown. Image acquisition, focusing, meridian flips, calibration frames, and guide star acquisition can be completely and totally done without intervention. At this point, having a proactive weather system is mandatory, as you are trusting the entire observatory to monitor itself.
Truthfully, the weather systems don’t really care if you are running the observatory autonomously - they simply monitor the weather and are ready to trigger a shutdown. Therefore, the level of observatory automation is separate from the ability of the weather system to shut it down when the bad weather happens.
TL;DR Summary
In my article entitled, “Where to Setup Your Telescope,” I made mention of an event that occurs annually at the Texas Star Party. Sometime during the week, a Dobsonian telescope of moderate size (usually 12” to 14”) gets picked up off the ground by the wind, spins into the air, and then crash lands on the hard Texas rocky soil. While I did not mention it expressly in that article, it stands to reason that what you decide to do with the weather information you have is entirely up to you. If you decide NOT to anchor down your telescopes during a week-long TSP, then that is your prerogative.
But I find most amateur astronomers to be quite good at protecting their equipment from anything that could harm such sizable investments. We take pride in the telescopes we own; perhaps an amount of pride greater than anything we’ve actually accomplished as astronomers.
This article is more about protecting yourselves, the hungry amateur astronomer. Speaking for myself, I am very goal oriented when it comes to this hobby, so much so that I often de-prioritize or forget about the things I should do to protect myself. Certainly, there have been times when my total disregard of the weather meant that I had to suffer a bit for the photons I saw. In this case, an ounce of prevention is worth a pound of cure, so I hope that you found this article full of ways in which you can prevent discomfort or catastrophe in the observing field.
Moreover, when you are ready to take the next step in building a permanent observatory for your gear, my hope is that you can take some of the theory about weather system design and customize it for your own installation. In this way, you get the most from your gear and you can insure that it keeps working, year after year, in safe and effective service.
(TL;DR = Too long; didn’t read)